Maximize Your Viewing Experience with a Ceiling Mount Projector: The Ultimate Guide for Home Theater Enthusiasts
04 Sep 2024
Embarking on a projector lift installation journey can be both exciting and challenging. In this comprehensive guide, we delve into the intricacies of installing projector lifts, providing you with a step-by-step walkthrough for a seamless setup. From understanding the fundamentals to mastering installation techniques, join us as we navigate through the essential tools, techniques, and expert insights necessary to achieve a successful projector lift installation
Ø Understanding the Basics of Projector Lifts
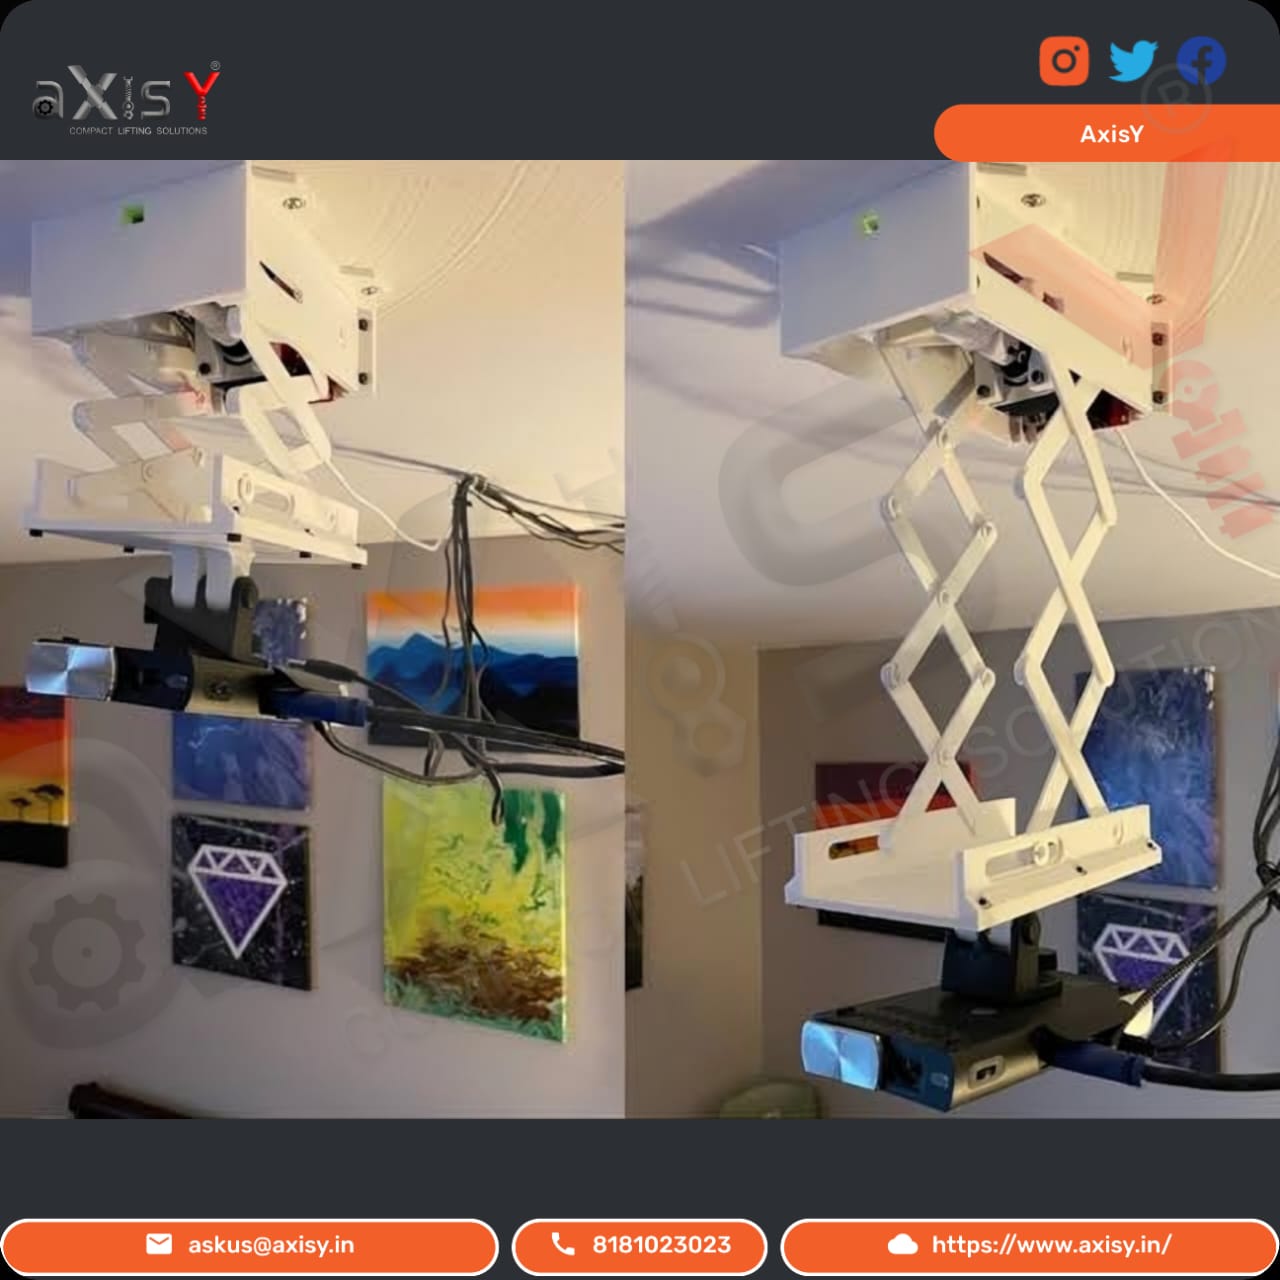
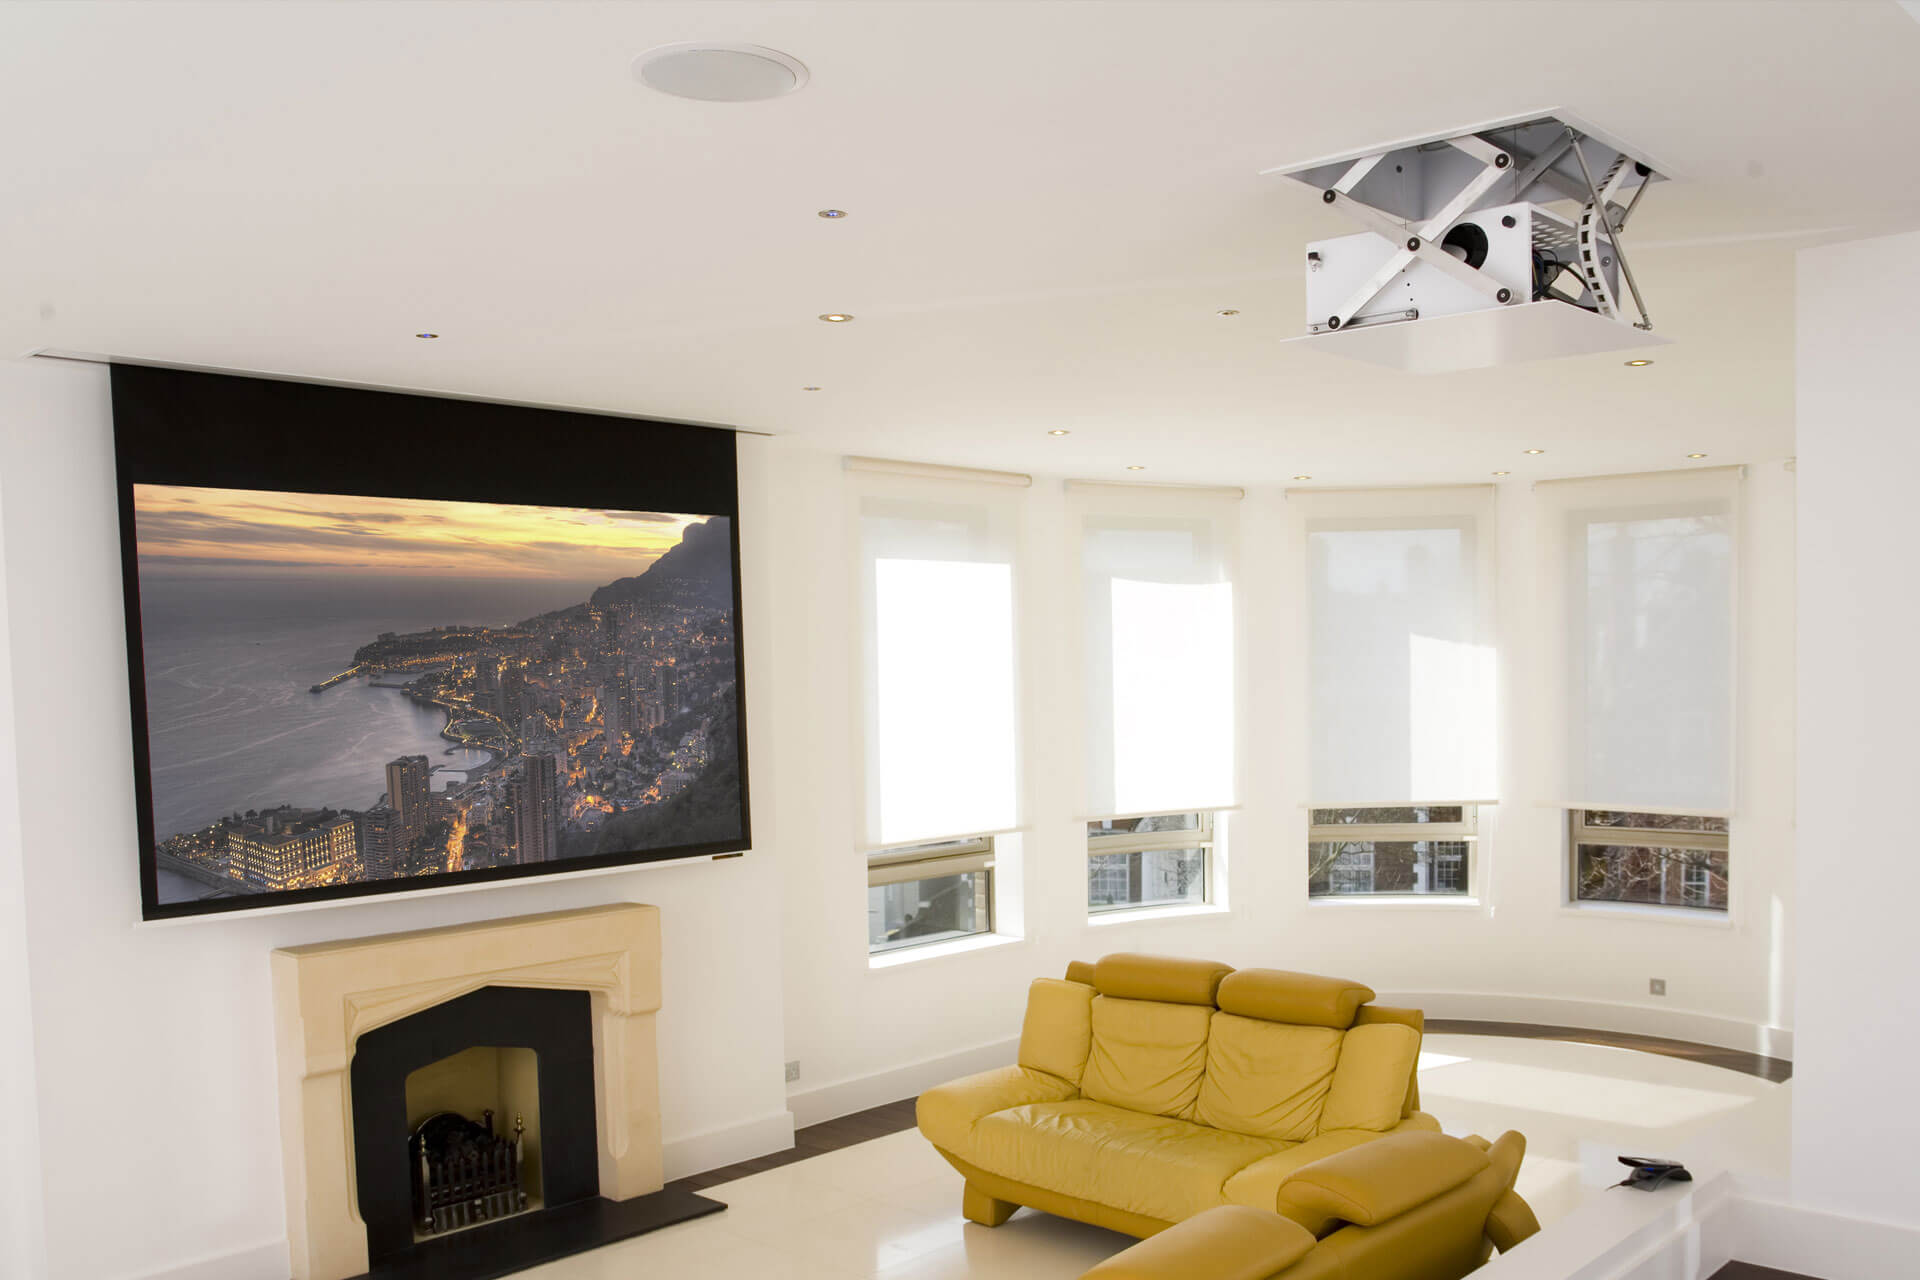
Projector lifts are innovative devices designed to seamlessly integrate with presentation environments, offering a discreet and functional solution for deploying and retracting projection screens. These lifts, including the exemplary offerings by AxisY, aim to elevate the overall presentation experience.
Key Features and Functionality:
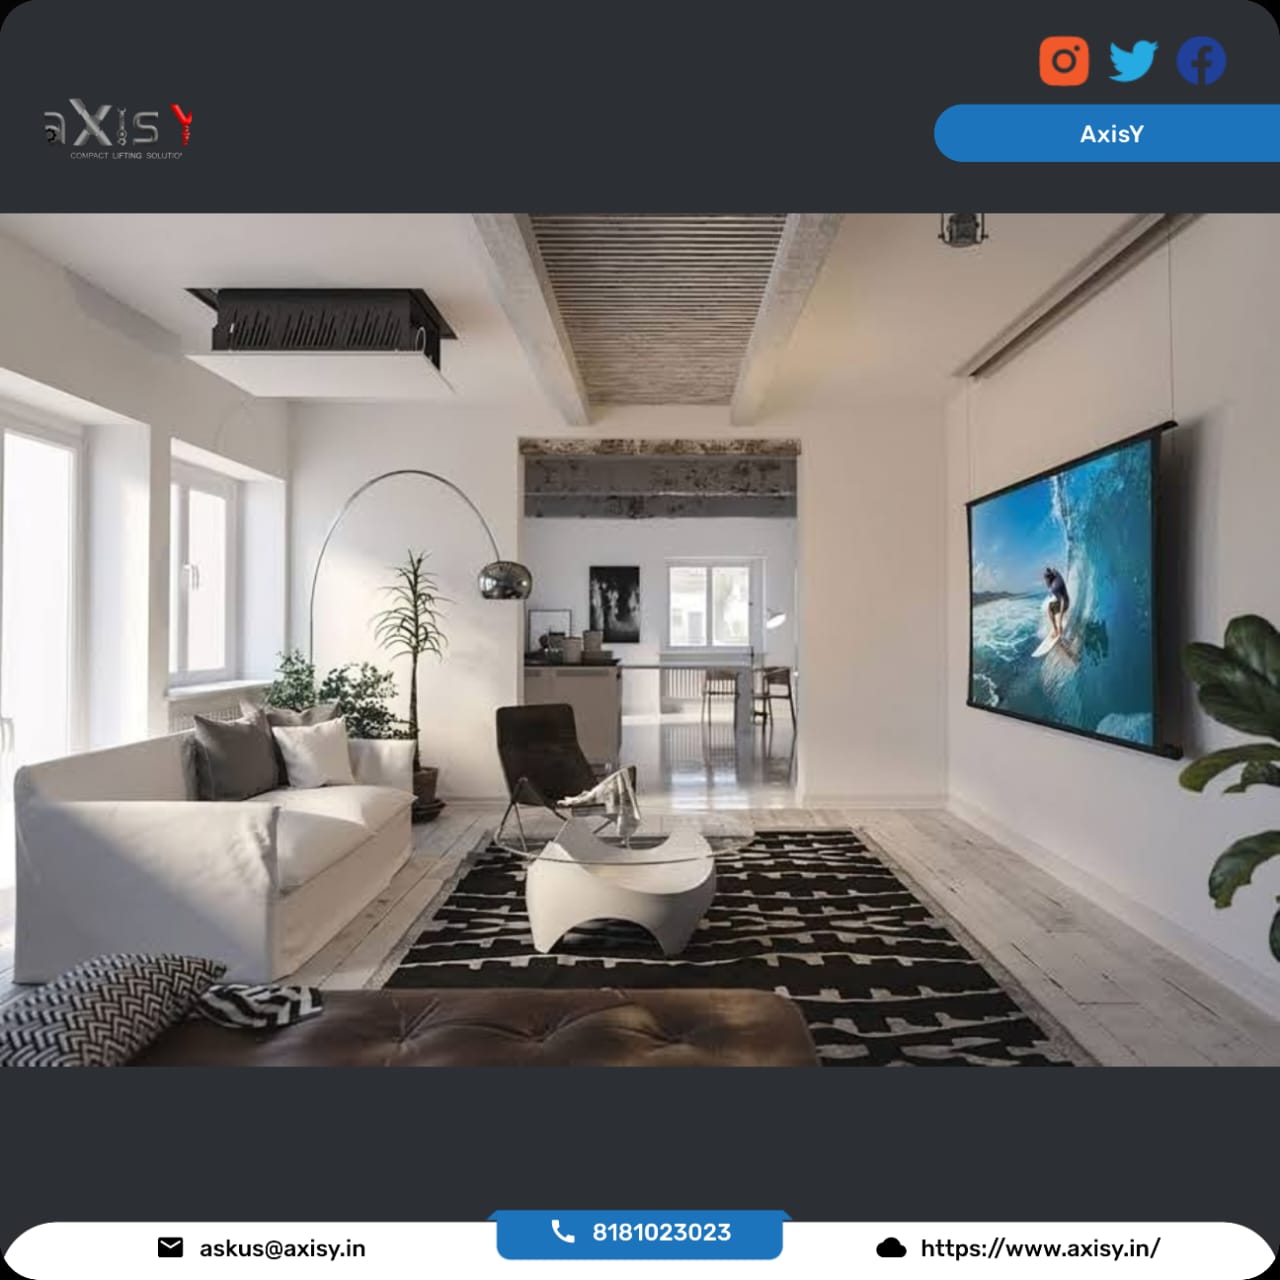
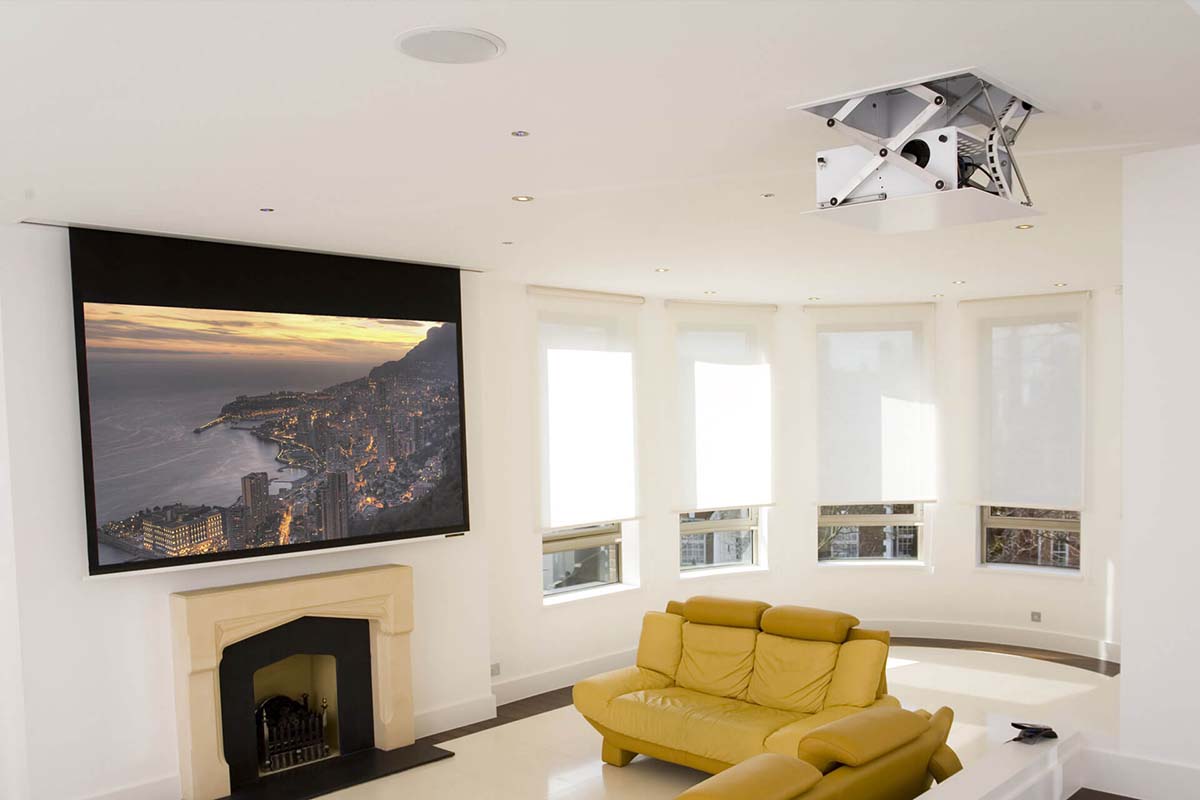
The AxisY projector lift epitomizes cutting-edge technology, providing motorized mechanisms that facilitate controlled vertical or horizontal movement of projection screens. Designed for optimal space utilization, these lifts integrate flawlessly within ceilings or floors, remaining concealed when not in use.
Customization and Adaptability:
One of the hallmarks of the AxisY projector lift is its adaptability. These lifts come in various sizes, weight capacities, and mounting configurations, ensuring compatibility with diverse room layouts and screen requirements. Whether it's a ceiling-mounted or floor-mounted installation, AxisY offers versatile solutions tailored to specific needs.
Enhanced User Experience:
AxisY's projector lifts prioritize user convenience and operational efficiency. With advanced remote control operation and automated position presets, presenters can effortlessly manage screen deployment and positioning, streamlining the overall presentation process.
Safety and Reliability:
Safety is paramount, and AxisY projector lifts are equipped with essential safety features. From limit switches to overload protection mechanisms, these lifts prioritize smooth, controlled movements while ensuring the safety of the lift and the installed screens.
Conclusion:
Understanding the basics of projector lifts, especially those offered by AxisY, reveals their advanced features, adaptability, user-centric design, and unwavering commitment to safety. As a fundamental component of modern presentation spaces, AxisY's projector lifts excel in providing functional, seamless, and reliable solutions for deploying projection screens.
Stay tuned for more insights into the installation, operation, and maintenance of AxisY projector lifts in the following sections of this guide.
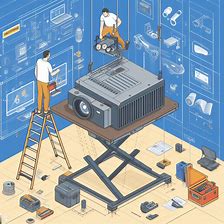
Ø Essential Tools for Successful Installation
Installing AxisY's projector lifts requires the use of specific tools to ensure a seamless setup process. Having the right tools at your disposal is essential for achieving a successful installation. Here's a list of essential tools you'll need:
1. Measuring Tape:
A measuring tape is indispensable for accurate measurements of the installation area, ensuring precise placement of the projector lift.
2. Drill and Bits:
A high-quality drill along with appropriate bits is necessary for creating holes in ceilings or floors for mounting the lift securely.
3. Screwdrivers:
Both Phillips and flathead screwdrivers are essential for fastening screws and securing components during the installation process.
4. Level:
A level ensures that the projector lift is installed perfectly straight and aligned, preventing any issues with its operation.
5. Stud Finder:
A stud finder helps locate ceiling or floor joists, providing guidance on where to securely mount the lift for maximum stability.
6. Wire Strippers and Connectors:
Wire strippers are crucial for handling electrical wiring connections, ensuring proper stripping and secure connections during installation.
7. Safety Equipment:
Personal protective equipment (PPE), such as gloves and safety goggles, should be worn during installation to ensure safety.
8. Ladder or Scaffold:
Depending on the installation height, a ladder or scaffold is necessary to access the installation area safely and effectively.
9. Voltage Tester:
A voltage tester is essential for verifying that the power source is turned off before working on electrical connections, ensuring safety during the installation process.
10. Additional Supplies:
Depending on the specific installation requirements, additional supplies such as screws, anchors, or brackets may be necessary.
Having these essential tools readily available before beginning the installation of AxisY's projector lifts ensures a smoother and more efficient setup process. With the right tools and proper preparation, the installation of AxisY's projector lifts can be accomplished effectively and with precision.
Ø Planning Your Installation Space
Before proceeding with the installation of AxisY's projector lifts, meticulous planning of the installation space is crucial to ensure a successful and seamless setup. Here are essential considerations when planning the installation space:
1. Assessing Room Layout:
Begin by assessing the room where the projector lift will be installed. Determine the most suitable location for seamless integration while considering the room's layout and intended use.
2. Ceiling or Floor Specifications:
Depending on the type of lift (ceiling-mounted or floor-mounted), evaluate the ceiling or floor specifications to ensure they can support the lift's weight and dimensions without compromising structural integrity.
3. Clearance and Height Requirements:
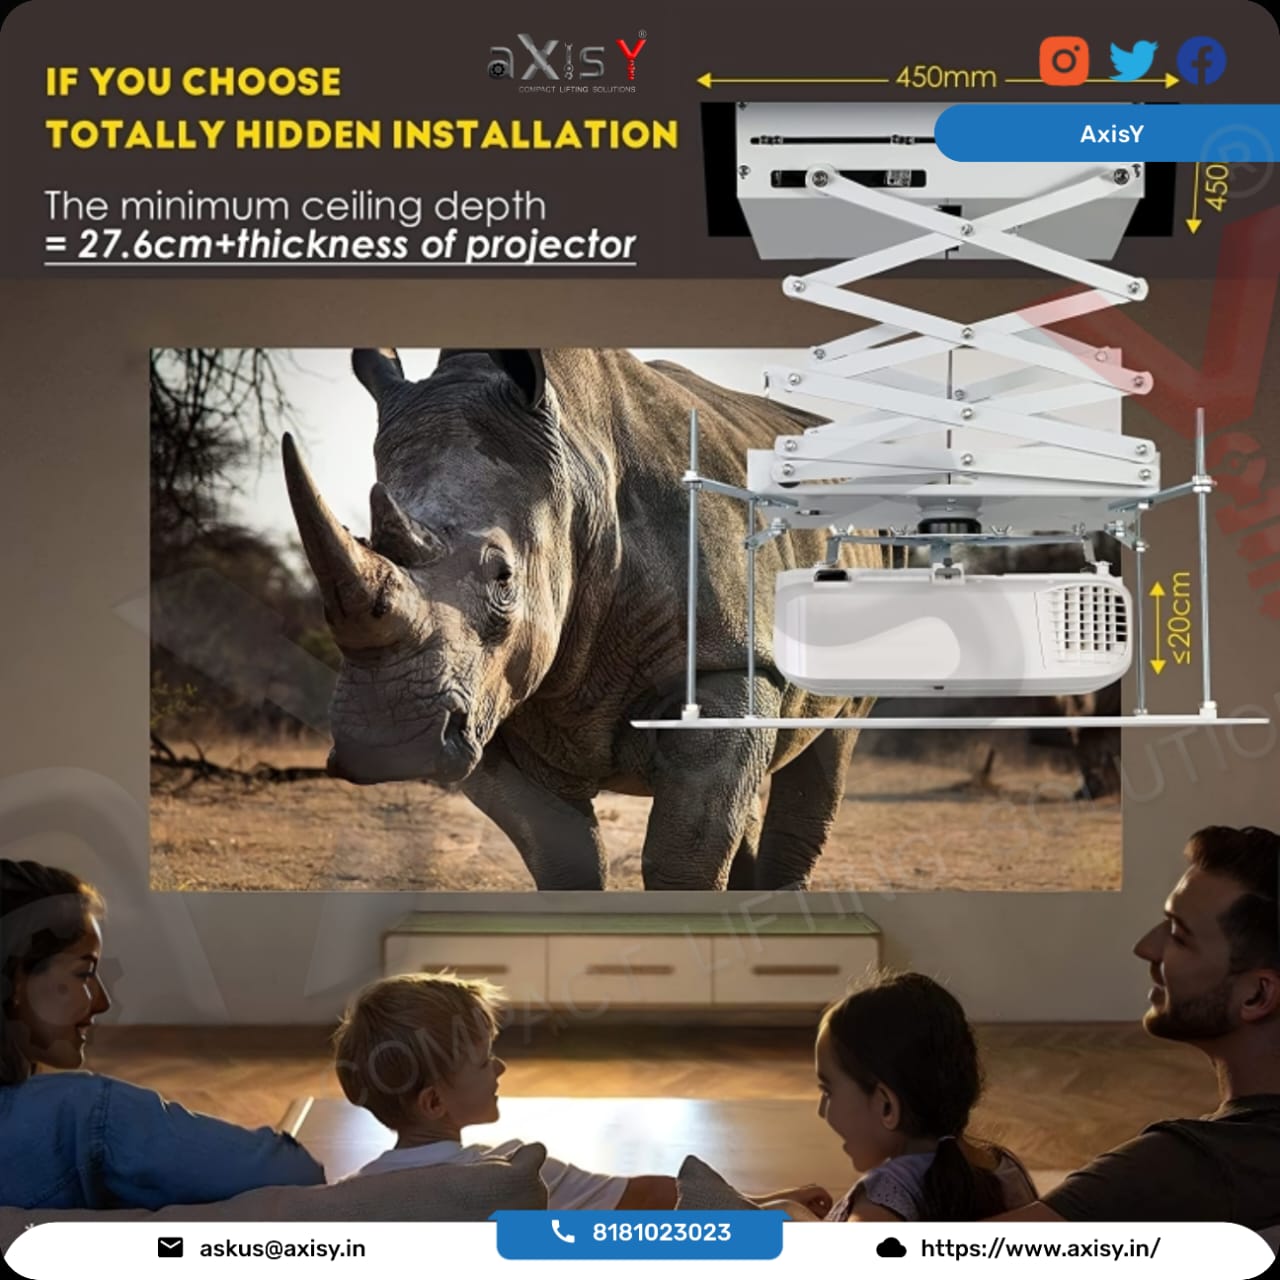
Calculate the necessary clearance and height requirements for the lift's operation. Ensure sufficient space above or below the installation area to accommodate the full range of motion without obstruction.
4. Electrical Access:
Consider the proximity to electrical outlets or wiring for the lift's power supply. Ensure easy access to power sources while adhering to electrical safety codes during installation.
5. Structural Support and Load-Bearing Capacity:
Determine the structural support and load-bearing capacity of the installation surface. Ceiling-mounted lifts require secure attachment to ceiling joists, while floor-mounted lifts need stable flooring to support their weight.
6. Room Aesthetics and Design Integration:
Plan the installation to seamlessly integrate with the room's aesthetics. AxisY's projector lifts offer a discreet and sleek design, allowing for a professional and unobtrusive installation that complements the room's design.
7. Accessibility and Maintenance Considerations:
Ensure ease of accessibility for maintenance purposes post-installation. Plan the installation in a way that allows for future maintenance without significant disruptions.
8. Safety Measures:
Prioritize safety by planning the installation in areas free from potential hazards or obstacles that could interfere with the lift's operation or compromise safety measures.
9. Consultation and Professional Assistance:
When in doubt or dealing with complex installation requirements, consider consulting professionals or technicians experienced in installing projector lifts for guidance and expert assistance.
Conclusion:
Thoroughly planning the installation space for AxisY's projector lifts ensures a well-thought-out setup that aligns with room specifications, safety requirements, and aesthetic considerations. Careful planning lays the foundation for a successful installation that maximizes the functionality of the lift while seamlessly integrating it into the presentation environment.
Ø Step-by-Step Guide for Ceiling-Mounted Installation
Ceiling-mounted installation of AxisY's projector lifts requires careful execution and adherence to specific steps to ensure a secure and functional setup. Follow this comprehensive guide for a successful ceiling-mounted installation:
1. Prepare the Installation Area:
Identify the ideal location on the ceiling for the lift's installation. Ensure that the chosen area meets the lift's specifications and has sufficient structural support.
2. Gather Essential Tools and Equipment:
Collect the necessary tools, including a drill, screws, a measuring tape, a level, a stud finder, and safety equipment, before starting the installation.
3. Mark and Cut the Opening:
Use measurements provided by AxisY's lift specifications to mark and cut the opening in the ceiling for the lift's housing. Take caution to follow precise measurements for a proper fit.
4. Securely Mount the Lift Frame:
Securely attach the lift frame to the ceiling joists using appropriate screws and mounting hardware. Ensure the frame is level and securely anchored to the ceiling for stability.
5. Install the Lift Mechanism:
Carefully install the lift mechanism into the housing according to AxisY's provided instructions. Ensure all components are securely fastened and aligned within the frame.
6. Wiring and Electrical Connections:
Handle electrical wiring connections as per the lift's instructions, ensuring proper installation and connections. Always follow electrical safety protocols and, if unsure, consult a professional.
7. Test the Lift's Operation:
Test the lift's operation by raising and lowering the mechanism multiple times. Confirm that the lift operates smoothly and without obstructions, ensuring its functionality.
8. Adjust and Fine-Tune if Necessary:
Make any necessary adjustments to the lift's positioning or operation for optimal functionality. Ensure everything operates seamlessly before finalizing the installation.
9. Clean Up and Final Inspection:
Clean up the installation area, removing any debris or excess materials. Conduct a final inspection to ensure the installation meets safety standards and is aesthetically pleasing.
10. Document Installation Details:
Keep documentation of the installation process, including manuals, diagrams, and any notes or adjustments made during the installation, for future reference or maintenance purposes.
Conclusion:
Following these step-by-step instructions ensures a smooth and precise ceiling-mounted installation of AxisY's projector lifts. Proper execution of each step is crucial for a secure and functional setup that seamlessly integrates the lift into the presentation space.
Ø Floor-Mounted Installation Techniques
Installing AxisY's projector lifts in a floor-mounted configuration requires meticulous planning and precise execution. Follow these techniques for a successful floor-mounted installation:
1. Determine Installation Area:
Choose an appropriate location on the floor where the lift will be installed. Ensure the area is level and can support the lift's weight without compromising stability.
2. Prepare the Mounting Surface:
Clear the installation area and ensure it is free from debris or obstructions. Clean the surface to provide a suitable base for the lift's installation.
3. Mark and Cut Hole in the Floor:
Using measurements provided by AxisY's lift specifications, mark and cut the hole in the floor. Exercise caution to follow precise measurements for a proper fit.
4. Securely Anchor the Lift Frame:
Position the lift frame over the cutout in the floor and securely anchor it using appropriate screws or mounting hardware. Ensure the frame is level and firmly attached to the floor.
5. Install the Lift Mechanism:
Carefully install the lift mechanism into the frame according to AxisY's provided instructions. Ensure all components are properly aligned and securely fastened.
6. Wiring and Electrical Connections:
Handle electrical wiring connections as per the lift's instructions, ensuring proper installation and connections. Adhere to electrical safety protocols throughout the process.
7. Test the Lift's Functionality:
Conduct thorough testing of the lift by raising and lowering the mechanism multiple times. Confirm that the lift operates smoothly and without any issues.
8. Fine-Tune and Adjust as Needed:
Make any necessary adjustments to the lift's positioning or operation for optimal functionality. Ensure it aligns with the intended floor layout and maintains stability.
9. Final Inspection and Cleanup:
Perform a final inspection to ensure the installation meets safety standards and aligns with aesthetic considerations. Clean up the installation area, removing any debris.
10. Document Installation Details:
Maintain documentation of the installation process, including manuals, diagrams, and any notes or adjustments made during the installation, for future reference or maintenance purposes.
Conclusion:
Following these techniques ensures a meticulous floor-mounted installation of AxisY's projector lifts. Each step, when executed carefully, contributes to a secure and functional setup that seamlessly integrates the lift into the presentation space.
Ø Wiring and Electrical Connections Demystified
Understanding the wiring and electrical connections is a crucial aspect of installing AxisY's projector lifts. Follow these steps to ensure proper wiring and electrical connections:
1. Safety Precautions:
Before starting any electrical work, ensure the power source is turned off. Use appropriate personal protective equipment (PPE), such as gloves and safety goggles, for safety.
2. Review the Manufacturer's Guidelines:
Refer to AxisY's provided installation manual for specific instructions regarding electrical wiring. Follow their guidelines meticulously to avoid errors.
3. Identify Power Sources:
Determine the power source for the lift. Ensure it meets the lift's electrical requirements and is accessible for wiring.
4. Electrical Wiring Setup:
Prepare the electrical wiring as per the manufacturer's instructions. Strip the wires carefully, ensuring proper insulation and avoiding any damage to the wires.
5. Connect Wiring to Power Supply:
Connect the lift's wiring to the designated power supply following the provided instructions. Ensure proper polarity and secure connections to prevent any electrical issues.
6. Test Connections:
After making the electrical connections, perform a thorough test to ensure the wiring is correctly connected and secure. Test the lift's functionality to verify the electrical setup.
7. Conceal Wiring Safely:
Conceal the wiring securely and in compliance with safety standards. Use appropriate channels or covers to protect the wiring from damage and maintain a neat installation.
8. Follow Electrical Codes:
Adhere to local electrical codes and regulations during the installation process. Ensure compliance with safety standards to prevent electrical hazards.
9. Professional Assistance if Needed:
If uncertain about electrical connections or working with electrical wiring, consider seeking assistance from a qualified electrician or technician.
10. Documentation and Post-Installation Checks:
Document all electrical connections made during the installation for future reference. Conduct post-installation checks to ensure all connections are secure and functional.
Conclusion:
Understanding and executing proper wiring and electrical connections are crucial steps in the installation of AxisY's projector lifts. By following these steps meticulously and adhering to safety protocols, you can ensure a safe and functional electrical setup for the lift.
Ø Testing and Calibration for Optimal Performance
Testing and calibration play a crucial role in ensuring the smooth operation and optimal performance of AxisY's projector lifts. Follow these steps for thorough testing and calibration:
1. Initial Functional Testing:
Upon installation, conduct initial functional testing of the lift. Test the lift's movement by raising and lowering the mechanism multiple times to ensure it operates smoothly.
2. Position Accuracy Testing:
Test the accuracy of the lift's positioning by setting specific screen positions if applicable. Verify that the lift stops precisely at the designated positions without deviation.
3. Load Testing:
If applicable, perform load testing by mounting the projection screen onto the lift. Test the lift's operation with the added weight to ensure it can handle the load smoothly and securely.
4. Calibration and Adjustment:
If the lift offers calibration options, follow the manufacturer's instructions to calibrate the lift. Make necessary adjustments to settings to fine-tune the lift's performance.
5. Noise and Vibration Testing:
Pay attention to any unusual noises or vibrations during the lift's operation. If observed, investigate and address the issues to ensure smooth and silent operation.
6. Remote Control and Automation Testing:
Test remote control operation and any automation features integrated into the lift. Verify that remote commands are executed accurately and that preset positions function correctly.
7. Integration with AV Systems:
If the lift is integrated with audiovisual (AV) systems, test its synchronization and compatibility with the AV setup to ensure seamless integration.
8. Repeated Testing and Final Checks:
Perform repeated testing under different scenarios to ensure consistent performance. Conduct final checks to confirm that the lift meets performance expectations.
9. Documentation of Testing Results:
Document the testing results and any adjustments made during the calibration process. Maintain records for future reference or troubleshooting purposes.
10. Post-Installation Performance Evaluation:
Evaluate the lift's overall performance post-installation. Ensure it meets the desired standards of functionality and reliability.
Conclusion:
Thorough testing and calibration are essential for achieving optimal performance from AxisY's projector lifts. By systematically testing various aspects and functionalities, you can ensure that the lift operates smoothly and reliably, meeting the requirements of your presentation setup.
Ø Troubleshooting Common Installation Issues
Despite meticulous planning and execution, installation issues can occasionally arise when setting up AxisY's projector lifts. Here's a troubleshooting guide to address common installation problems:
1. Lift Fails to Operate:
Check the power source and ensure it's properly connected. Verify that the power supply is functioning and that the lift's wiring is correctly installed and connected.
2. Uneven or Jerky Movement:
Verify that the lift is securely mounted and aligned. Uneven movement may indicate an issue with the lift's alignment or mounting, requiring adjustments.
3. Excessive Noise or Vibration:
Inspect the lift for any loose components or obstructions causing noise or vibration during operation. Tighten any loose parts and remove any obstructions.
4. Electrical Issues:
If facing electrical issues, such as a failure to respond to remote commands, check the wiring connections and ensure they're properly secured and connected.
5. Screen Position Inaccuracy:
If the lift fails to stop accurately at preset screen positions, recalibrate the lift according to the manufacturer's instructions. Ensure calibration settings align with desired positions.
6. Overload or Weight Issues:
Verify that the lift can support the weight of the projection screen. Exceeding weight limits may cause malfunctions. Consider reducing the load if necessary.
7. Remote Control Problems:
If encountering remote control issues, check the remote's battery and functionality. Ensure proper synchronization between the remote and the lift's receiver.
8. Connectivity and Integration Problems:
For lifts integrated with AV systems, verify compatibility and proper connections. Check for any communication issues between the lift and the AV setup.
9. Consult the Installation Manual:
Refer to AxisY's installation manual for troubleshooting guidance. Follow the manufacturer's recommended troubleshooting steps specific to the lift model.
10. Professional Assistance if Needed:
If unable to resolve issues or if the problem persists, seek assistance from AxisY's customer support or consult a qualified technician for expert guidance.
Conclusion:
By identifying and addressing common installation issues systematically, you can troubleshoot and resolve potential problems encountered during the setup of AxisY's projector lifts, ensuring a smooth and reliable operation.
Ø Maintenance Tips for Longevity
Maintaining AxisY's projector lifts is essential to ensure their longevity and optimal performance over time. Here are key maintenance tips:
1. Regular Inspection:
Conduct routine inspections of the lift's components, including motors, cables, and moving parts, to detect any signs of wear, damage, or misalignment.
2. Cleaning and Dust Removal:
Keep the lift and its surrounding area clean and free from dust or debris. Regularly clean the lift's surfaces and remove any accumulated dust or dirt.
3. Lubrication of Moving Parts:
Apply lubrication to the lift's moving parts as recommended by the manufacturer. Lubricating components such as gears and bearings helps reduce friction and ensures smooth operation.
4. Check Electrical Connections:
Periodically inspect electrical connections for signs of corrosion, loose wires, or damage. Tighten any loose connections and address any electrical issues promptly.
5. Verify Mounting and Alignment:
Check the lift's mounting and alignment periodically to ensure it remains secure and properly aligned. Make adjustments if necessary to maintain stability.
6. Calibration and Functionality Testing:
Regularly test the lift's functionality, including its range of motion and positioning accuracy. Recalibrate the lift if needed to maintain precise functionality.
7. Safety Mechanism Check:
Verify that the lift's safety features, such as limit switches or overload protection, are functioning correctly. Ensure these safety mechanisms are in place and operational.
8. Preventative Maintenance Schedule:
Establish a preventative maintenance schedule based on the manufacturer's recommendations. Follow the maintenance schedule to address specific maintenance tasks at regular intervals.
9. Keep Documentation Updated:
Maintain records of maintenance activities, including dates of inspections, repairs, or part replacements. Documenting maintenance helps track the lift's performance history.
10. Professional Servicing if Required:
If encountering complex issues or if the lift requires extensive servicing, consider seeking professional maintenance services from AxisY's authorized technicians.
Conclusion:
By adhering to a proactive maintenance routine and following these tips, you can ensure the longevity and optimal functionality of AxisY's projector lifts. Regular maintenance contributes to prolonged durability and reliable performance.
Ø Expert Advice and Pro Tips for Installation Success
Achieving installation success for AxisY's projector lifts requires attention to detail and adherence to best practices. Here are expert tips to enhance the installation process:
1. Thorough Planning and Preparation:
Invest ample time in planning the installation. Consider room layout, structural support, and electrical requirements beforehand to streamline the installation process.
2. Accurate Measurements and Alignment:
Precision is key. Ensure accurate measurements and alignment during installation. Even slight deviations can affect the lift's functionality.
3. Follow Manufacturer Guidelines:
Adhere strictly to AxisY's installation guidelines. Follow step-by-step instructions provided in the manual for precise installation.
4. Secure Mounting and Reinforcement:
Prioritize secure mounting and reinforcement of the lift. Properly anchor the lift to ceilings or floors using appropriate hardware for stability.
5. Test Functionality Throughout:
Test the lift's functionality at various stages of installation. Regular testing ensures early detection of potential issues.
6. Attention to Electrical Connections:
Exercise caution when dealing with electrical connections. Double-check connections to prevent electrical issues post-installation.
7. Safety First:
Prioritize safety during installation. Adhere to safety protocols, use appropriate safety gear, and ensure a safe working environment.
8. Document and Maintain Records:
Keep detailed records of the installation process. Document measurements, adjustments, and any modifications made during installation for future reference.
9. Seek Professional Assistance if Necessary:
If faced with complexities or uncertainties during installation, don't hesitate to seek assistance from AxisY's customer support or qualified professionals.
10. Post-Installation Follow-Up:
Conduct post-installation checks. Ensure the lift operates as intended and meets safety standards before finalizing the installation.
Conclusion:
Incorporating expert advice and pro tips into the installation process significantly contributes to the success of installing AxisY's projector lifts. By emphasizing meticulous planning, precision, and adherence to guidelines, you can ensure a successful and reliable installation.