Projector Lift: The Ultimate Guide
AxisY
Post by Er. Harshvardhan, Sep 27, 2023.
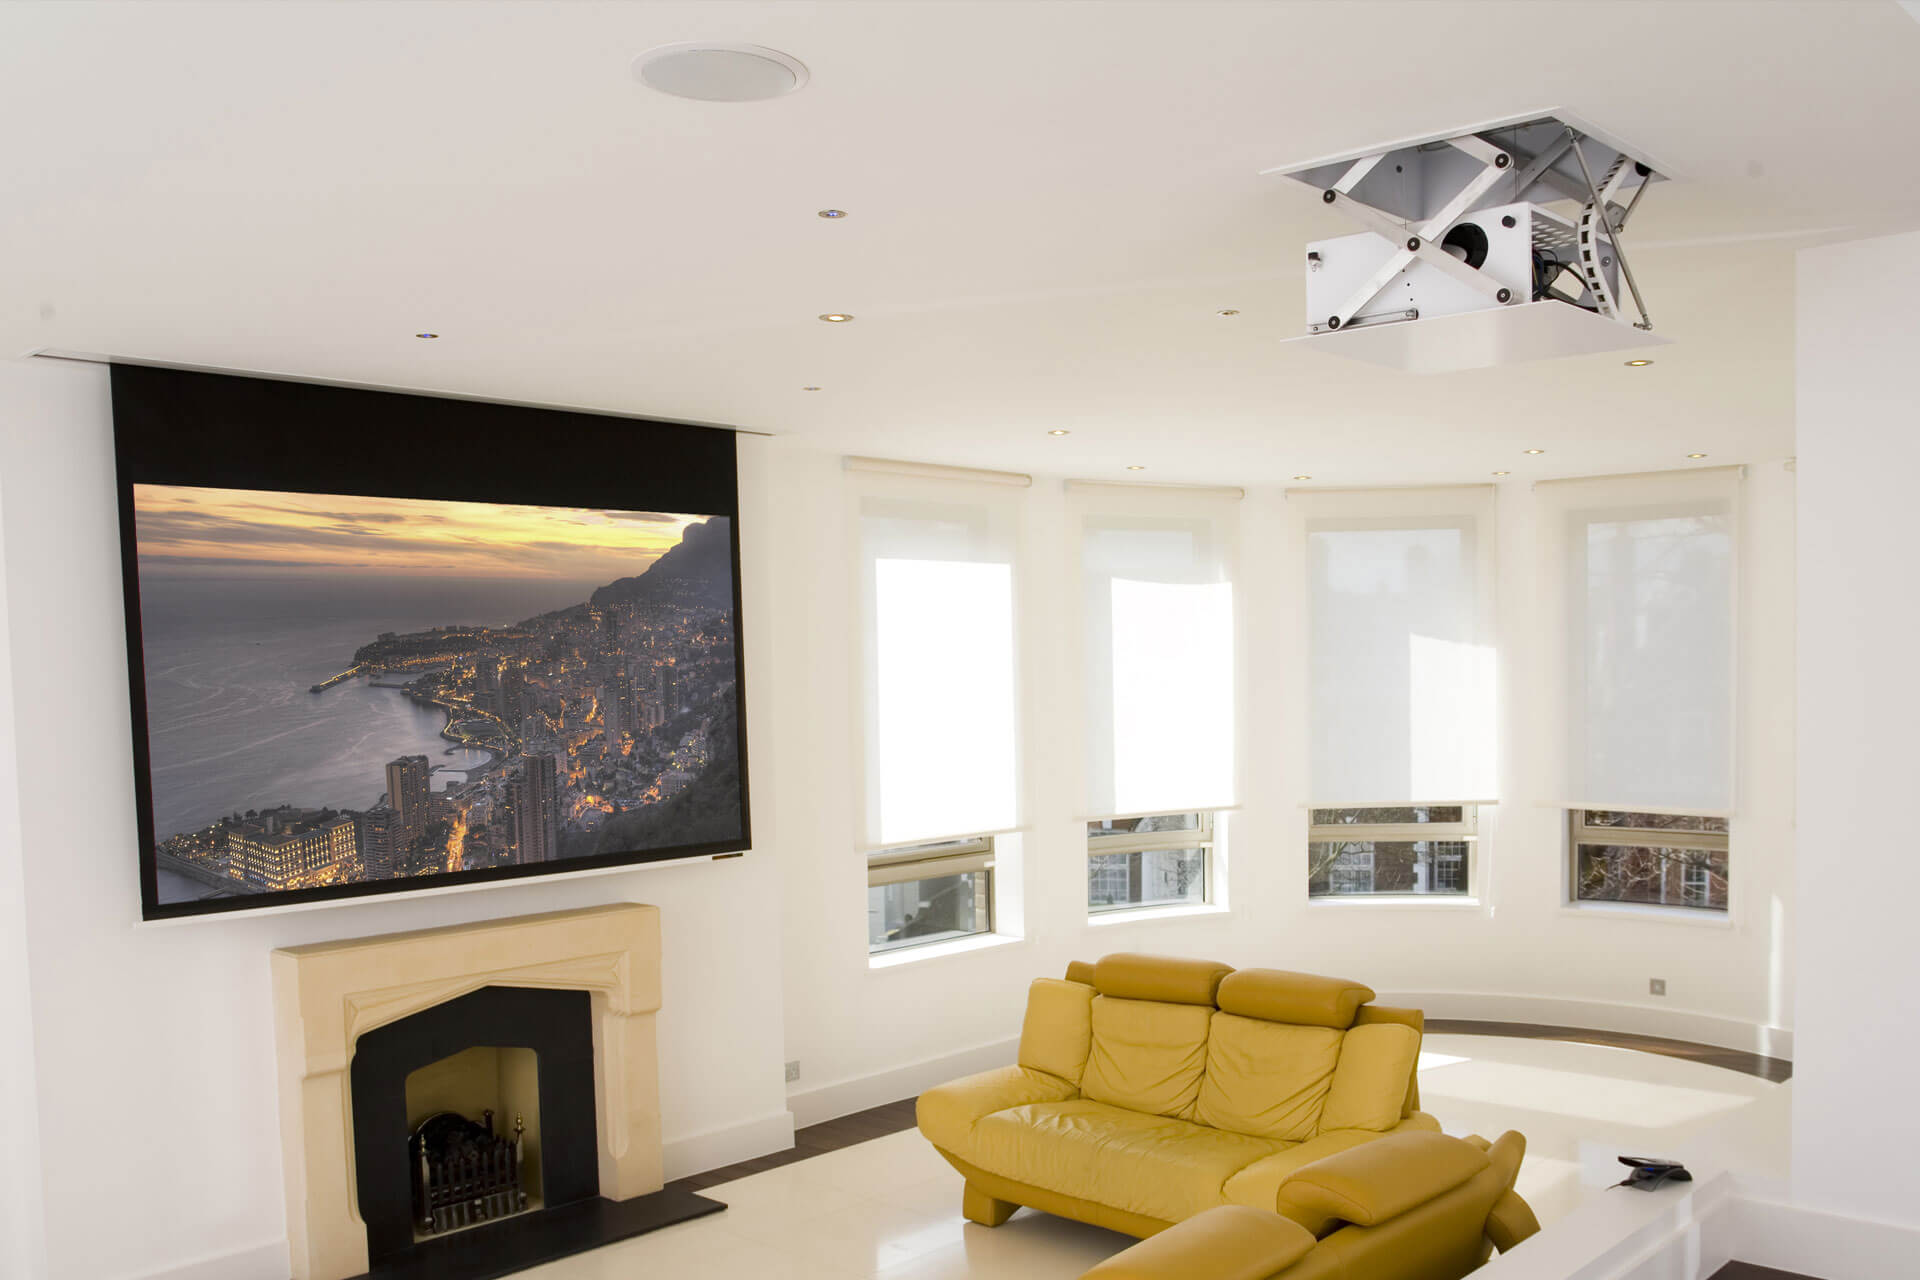
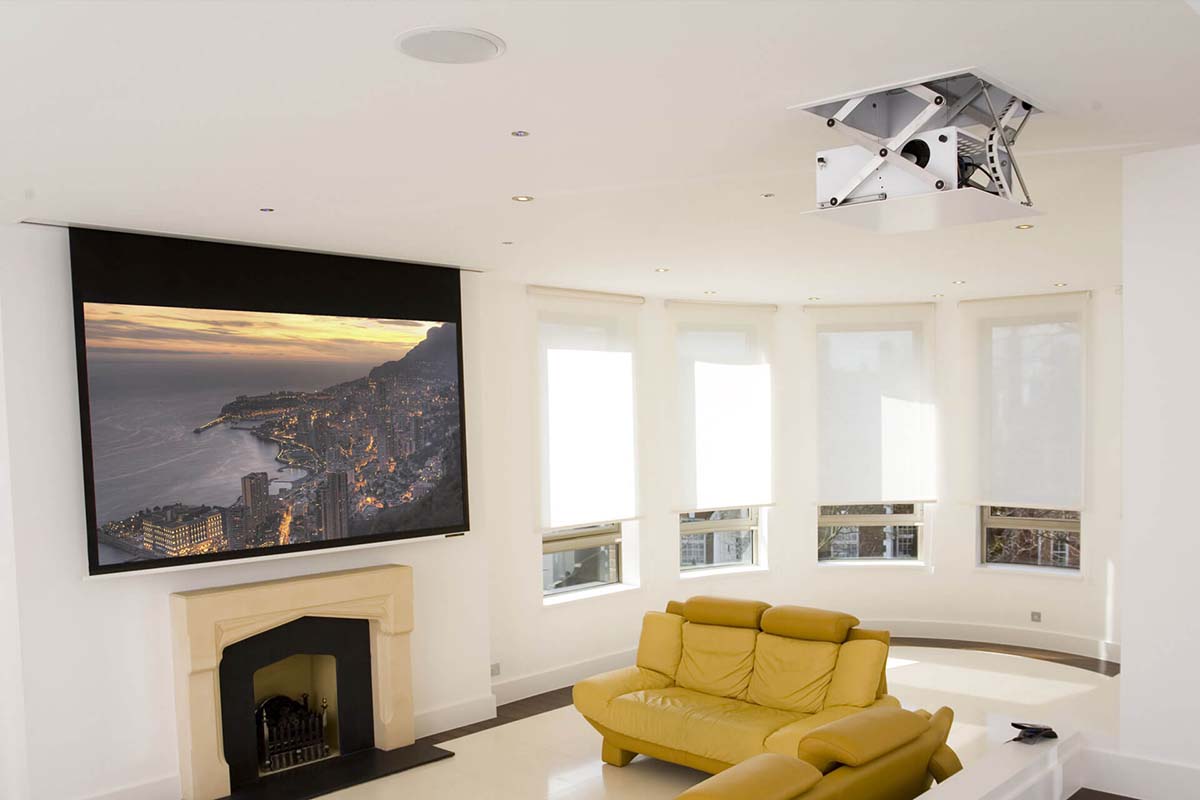
A projector lift is a device that allows you to mount your projector to the ceiling and raise and lower it as needed. This is a great way to improve your home theater experience, as it allows you to achieve the perfect viewing angle and protect your projector from dust and damage.
Benefits of using a projector lift
There are many benefits to using a projector lift, including:
-
Improved viewing experience: By mounting / installation of your projector to the ceiling, you can achieve the perfect viewing angle for your home theater. This is especially important if you have a large room or if you want to project onto a screen that is mounted / installed high on the wall.
-
Projector protection: Projector lifts can help to protect your projector from dust, dirt, and other damage when it's not in use. This can help to extend the lifespan of your projector and ensure that it continues to perform at its best.
-
Added value to your home: A projector lift can be a great feature to add to your home, especially if you're thinking about selling it in the future. Buyers are increasingly looking for homes with smart features and amenities, and a projector lift is definitely a head-turner.
Types of projector lifts
There are two main types of projector lifts: manual and motorized.
-
Manual projector lifts: Manual projector lifts are the more affordable option, but they require more effort to operate. You will need to manually raise and lower the projector using a crank or lever.
-
Motorized projector lifts: Motorized projector lifts are more expensive, but they are also much more convenient to use. You can raise and lower the projector using a remote control or a switch on the wall.
Choosing the right projector lift
When choosing a projector lift, there are a few things to keep in mind:
-
The weight of your projector: Make sure to choose a lift that can support the weight of your projector.
-
The height of your ceiling: Choose a lift that has a drop length that is long enough to reach your desired viewing height.
-
The features you want: Consider the features that are important to you, such as remote control operation, quiet operation, and safety features.
Installing a projector lift / Proper installation guide
Installing a projector lift is a relatively straightforward process, but it is important to follow the instructions carefully to ensure a safe and proper installation.
Here are the basic steps for installing a projector lift:
-
Mark the location of the projector lift on the ceiling for projector lift installation.
-
Drill holes for the mounting screws.
-
Secure the projector lift to the ceiling, while projector lift installation.
-
Mount the projector to the projector lift.
-
Connect the projector and projector lift to power.
-
Test the projector lift to make sure it is working properly.
-
Congrats you successfully done with your projector lift installation.
Troubleshooting projector lift problems
If you are having problems with your projector lift, here are a few things to check:
-
Make sure that the lift is properly installed. Check the mounting screws to make sure they are tight.
-
Make sure that the lift is connected to power.
-
Make sure that the projector is not overloaded. The lift should not be supporting more weight than it is rated for.
-
Check the safety features. Make sure that the safety features are engaged and working properly.
If you are still having problems, consult the manufacturer's instructions or contact the manufacturer for support.
Conclusion
Projector lifts are a great way to improve your home theater experience. They offer a number of benefits, including improved viewing experience, projector protection, and added value to your home.
If you are considering installing a projector lift, be sure to choose the right model for your needs and follow the instructions carefully.
Additional information
Types of projectors that can be used with projector lifts
Projector lifts can be used with a variety of different types of projectors, including:
-
Home theater projectors: Home theater projectors are designed to provide a high-quality viewing experience for movies, TV shows, and video games. They typically have high resolution and brightness, and they can be used to project onto screens of all sizes.
-
Business projectors: Business projectors are designed for presentations and other business applications. They typically have lower resolution and brightness than home theater projectors, but they are also more portable and affordable.
-
Short throw projectors: Short throw projectors are designed to project images from a short distance. This makes them ideal for small rooms or rooms where there is not a lot of space between the projector and the screen.
-
Ultra short throw projectors: Ultra short throw projectors can project images from a very short distance, making them ideal for even smaller rooms or rooms
Other factors to consider when choosing a projector lift
In addition to the type of projector you will be using, there are a few other factors to consider when choosing a projector lift:
-
The height of your ceiling: Projector lifts come in a variety of drop lengths, so it is important to choose a lift that is long enough to reach your desired viewing height.
-
The weight of your projector: Projector lifts have a weight capacity, so it is important to choose a lift that can support the weight of your projector.
-
The features you want: Projector lifts come with a variety of features, such as remote control operation, quiet operation, and safety features. Consider which features are important to you and choose a lift that has them.
Types of projector lifts
There are two main types of projector lifts: manual and motorized.
-
Manual projector lifts: Manual projector lifts are the more affordable option, but they require more effort to operate. You will need to manually raise and lower the projector using a crank or lever.
-
Motorized projector lifts: Motorized projector lifts are more expensive, but they are also much more convenient to use. You can raise and lower the projector using a remote control or a switch on the wall.
Choosing the right projector lift
When choosing a projector lift, there are a few things to keep in mind:
-
The weight of your projector: Make sure to choose a lift that can support the weight of your projector.
-
The height of your ceiling: Choose a lift that has a drop length that is long enough to reach your desired viewing height.
-
The features you want: Consider the features that are important to you, such as remote control operation, quiet operation, and safety features.
-
Your budget: Projector lifts can range in price from a few hundred dollars to several thousand dollars. Set a budget before you start shopping so that you don't overspend.
Installing a projector lift
Installing a projector lift is a relatively straightforward process, but it is important to follow the instructions carefully to ensure a safe and proper installation.
Here are the basic steps for installing a projector lift:
-
Mark the location of the projector lift on the ceiling.
-
Drill holes for the mounting screws.
-
Secure the projector lift to the ceiling.
-
Mount the projector to the projector lift.
-
Connect the projector and projector lift to power.
-
Test the projector lift to make sure it is working properly.
Troubleshooting projector lift problems
If you are having problems with your projector lift, here are a few things to check:
-
Make sure that the lift is properly installed. Check the mounting screws to make sure they are tight.
-
Make sure that the lift is connected to power.
-
Make sure that the projector is not overloaded. The lift should not be supporting more weight than it is rated for.
-
Check the safety features. Make sure that the safety features are engaged and working properly.
If you are still having problems, consult the manufacturer's instructions or contact the manufacturer for support.
Benefits of using a projector lift
There are many benefits to using a projector lift, including:
-
Improved viewing experience: By mounting your projector to the ceiling, you can achieve the perfect viewing angle for your home theater. This is especially important if you have a large room or if you want to project onto a screen that is mounted high on the wall.
-
Projector protection: Projector lifts can help to protect your projector from dust, dirt, and other damage when it's not in use. This can help to extend the lifespan of your projector and ensure that it continues to perform at its best.
-
Added value to your home: A projector lift can be a great feature to add to your home, especially if you're thinking about selling it in the future. Buyers are increasingly looking for homes with smart features and amenities, and a projector lift is definitely a head-turner.
-
Aesthetics: Projector lifts can help to create a more streamlined and elegant look for your home theater. By hiding the projector away when it's not in use, you can create a more minimalist and clutter-free space.
Other types of projector lifts
In addition to the traditional ceiling-mounted projector lifts, there are also a few other types of projector lifts available, including:
-
Floor-to-ceiling projector lifts: Floor-to-ceiling projector lifts are ideal for rooms where there is not enough ceiling space to install a traditional ceiling-mounted projector lift.
-
Tabletop projector lifts: Tabletop projector lifts are ideal for small rooms or rooms where you need to be able to move the projector around.
-
Recessed projector lifts: Recessed projector lifts are ideal for rooms where you want to completely conceal the projector when it's not in use.
Cautions while projector lift installation:
-
Use proper suppor support to stand to install projector lift to ceiling.
-
Use hand glubs while installation of projector lift.
-
Use proper screw drivers and hand tools mentioned in the projector lift manual while installation of projector lift.
-
Ask to technician about all technical details and installation guide before installation of projector lift.
-
Install projector lift in assistance of expert.
Absolutely, here's a step-by-step guide on installing a projector lift:
Title: A Comprehensive Guide: Step-by-Step Installation of a Projector Lift
Introduction:
Installing a projector lift can significantly elevate your presentation setup by optimizing space and providing a seamless, clutter-free environment. This comprehensive guide will walk you through the step-by-step process of installing a projector lift, ensuring a hassle-free and efficient installation experience.
Step 1: Gather Necessary Tools and Equipment
Before beginning the installation process, ensure you have the required tools and equipment handy:
Drill
Screwdrivers (Phillips and flathead)
Level
Measuring tape
Stud finder
Wire cutters
Safety goggles
Power drill
Screws and bolts (as specified by the lift's instructions)
Projector lift kit components
The initial phase of projector lift installation begins with gathering the essential tools and equipment required for a seamless setup. Ensuring you have the appropriate tools handy streamlines the installation process, making it more efficient and hassle-free. Here is a comprehensive list of tools necessary for projector lift installation:
Drill for Installation: A power drill equipped with appropriate bits for drilling holes for screws and bolts is crucial for securing the projector lift components to the ceiling and other structural elements.
Screwdrivers for Fastening: Both Phillips and flathead screwdrivers will be needed for securing screws and fastening various components during the installation process.
Level for Alignment: Ensuring a level installation is imperative. A reliable level tool helps maintain accuracy in positioning the projector lift components, avoiding any misalignment issues.
Measuring Tape for Precision: Accurate measurements are key. A measuring tape allows you to determine precise distances for mounting the lift mechanism and projector platform.
Stud Finder for Structural Support: Locating studs or ceiling joists is crucial for securing the projector lift to stable structural elements. A stud finder assists in identifying these load-bearing points accurately.
Wire Cutters for Cable Management: Wire cutters aid in managing and trimming excess wires to ensure a clean and organized installation, preventing any interference with the lift's mechanism.
Safety Gear: Safety goggles are essential for eye protection while working with tools and equipment during the installation process.
Specific Screws and Bolts: The manufacturer's instructions will specify the appropriate screws and bolts required for attaching various components of the projector lift securely.
Projector Lift Kit Components: Ensure all components from the projector lift kit are available and ready for assembly and installation, following the manufacturer's guidelines.
Power Drill for Wiring: A power drill might be necessary for drilling holes to route and manage power and control wires during installation.
By ensuring you have these essential tools and equipment available before commencing the projector lift installation, you lay the groundwork for a successful and efficient setup process. Proper preparation with these tools ensures a smooth and well-executed installation, contributing to an optimal presentation environment.
Step 2: Choose the Mounting Location
Identify the ideal location for your projector lift. Consider factors such as ceiling height, proximity to the screen, and accessibility for maintenance.
Selecting the optimal location for installing your projector lift is a crucial aspect of the setup process. This step requires careful consideration of various factors to ensure an effective and functional installation.
Factors to Consider for Projector Lift Installation Location:
Ceiling Height and Projection Angle Optimization: Determine the ideal ceiling height to mount the projector lift. This height will depend on the projection angle required to project onto the screen or display area effectively.
Accessibility and Maintenance: Choose a location that allows easy access for maintenance and adjustments to the projector lift mechanism in the future. Accessibility will facilitate any required servicing or modifications without significant disruptions.
Proximity to the Screen or Display Area: Ensure the mounting location allows the projector to project onto the screen or display area without obstruction. This proximity ensures optimal image quality and coverage.
Structural Support: Identify structural elements such as ceiling joists or studs to provide secure and stable anchoring points for the projector lift. Installing the lift on sturdy structural elements ensures its stability and safety.
Room Layout and Aesthetic Considerations: Consider the overall room layout and aesthetics when selecting the mounting location. The placement should complement the room's design while maintaining a clean and professional appearance.
Ease of Wiring and Cable Management: Choose a location that facilitates the routing and management of power and control wires. Proper cable management ensures a tidy and organized installation, preventing any interference with the lift's mechanism.
Potential Obstructions or Interference: Evaluate the mounting location for potential obstructions or elements that might interfere with the projector lift's operation, such as lighting fixtures or ceiling structures.
Conclusion
Choosing the ideal mounting location for your projector lift installation requires a thoughtful assessment of various factors. By considering ceiling height, accessibility, structural support, room layout, and potential obstructions, you can ensure a well-placed and effective installation. Careful consideration during this step sets the foundation for an optimized and functional projector lift setup, enhancing your presentation experience significantly.
By meticulously considering these factors when selecting the mounting location for your projector lift installation, you can lay the groundwork for a successful setup that optimizes both functionality and aesthetics. This thoughtful approach ensures that your projector lift seamlessly integrates into your space while delivering optimal performance for impactful presentations.
Step 3: Locate and Mark Studs or Ceiling Joists for Projector Lift Installation
Use a stud finder to locate studs or ceiling joists where you will anchor the projector lift. Mark these positions accurately.
Before proceeding with the actual installation of the projector lift, it is crucial to locate and mark the studs or ceiling joists where you will anchor and secure the lift components. This step is essential for ensuring the stability, safety, and structural integrity of the projector lift installation.
Procedure for Locating and Marking Studs or Ceiling Joists:
Use a Stud Finder for Accuracy: Begin by using a stud finder, a handy tool that detects changes in wall density, to precisely locate the studs or ceiling joists in the installation area. Move the stud finder along the ceiling surface, and it will indicate when it detects a stud or joist.
Mark the Studs or Joists: Once the studs or ceiling joists are detected, mark their positions using a pencil or marker. Make clear and visible marks to indicate where the lift components will be anchored.
Ensure Proper Spacing: Studs or joists are typically spaced at regular intervals. Verify the spacing between the marked points to ensure the projector lift components can be securely anchored to multiple structural points for stability.
Double-Check for Accuracy: After marking the studs or joists, double-check the positions to ensure accuracy and precision. Use a measuring tape to confirm the distances between marks for consistency and alignment.
Importance of Marking Studs or Ceiling Joists:
Structural Support: Anchoring the projector lift components to sturdy studs or ceiling joists ensures robust structural support. This anchoring method provides stability and safety for the lift mechanism.
Weight Distribution: Distributing the weight of the projector lift across multiple studs or joists prevents strain on a single point, reducing the risk of structural damage and ensuring the load is evenly supported.
Prevention of Sagging or Instability: Properly marked and anchored studs or joists prevent the projector lift from sagging or becoming unstable over time, maintaining its functionality and longevity.
Conclusion
Locating and marking the studs or ceiling joists for projector lift installation is a critical preparatory step that lays the foundation for a secure and stable installation. Accurate marking of these structural elements ensures proper anchoring, weight distribution, and stability, contributing to a safe and reliable projector lift setup.
By meticulously marking the studs or ceiling joists for your projector lift installation, you establish a secure foundation for anchoring the lift components. This step ensures stability, structural integrity, and safety, setting the stage for a successful and long-lasting projector lift setup that enhances your presentation environment.
Step 4: Mount the Ceiling Bracket for Projector Lift Installation
Attach the ceiling bracket securely to the marked studs or ceiling joists using appropriate screws and bolts. Ensure the bracket is level and firmly anchored to provide stable support.
Mounting the ceiling bracket serves as a pivotal step in the installation process of a projector lift. The ceiling bracket provides the foundational support necessary for securely anchoring and suspending the lift mechanism. Proper installation of the ceiling bracket ensures stability and safety for the projector lift.
Procedure for Mounting the Ceiling Bracket:
Align the Bracket with Marked Positions: Position the ceiling bracket in alignment with the marked stud or ceiling joist positions. Ensure that the bracket is centered and oriented correctly according to the planned installation layout.
Pre-Drill Holes for Screws: Using a drill equipped with an appropriate bit, pre-drill holes into the ceiling or structural elements at the marked positions for secure attachment of the bracket. Ensure the drill bit size matches the screws provided for mounting the bracket.
Attach the Ceiling Bracket: Securely fasten the ceiling bracket to the pre-drilled holes using the designated screws and bolts provided in the projector lift kit. Tighten the screws firmly to ensure a stable and secure attachment.
Use a Level for Alignment: Verify that the ceiling bracket is level and aligned correctly by using a level tool. This ensures that the bracket is securely anchored and provides a stable base for the projector lift.
Double-Check Secure Fastening: Double-check the fastening of the ceiling bracket to ensure that all screws are tightened securely. Confirm that the bracket is firmly anchored to the structural elements, guaranteeing stability and support for the projector lift.
Importance of Mounting the Ceiling Bracket:
Stability and Load-Bearing Support: The ceiling bracket serves as the primary anchor point for suspending the projector lift. Proper installation and secure attachment to structural elements ensure stability and reliable load-bearing support.
Even Weight Distribution: The bracket's secure attachment to studs or ceiling joists facilitates even weight distribution, preventing excessive stress on specific points and maintaining the projector lift's stability.
Safety and Durability: A well-mounted ceiling bracket ensures the safety and durability of the projector lift installation, minimizing the risk of structural failure or instability during operation.
Conclusion
Mounting the ceiling bracket is a crucial step in the projector lift installation process, providing the foundational support necessary for a secure and stable setup. A properly installed ceiling bracket ensures stability, load-bearing support, and safety, setting the stage for the successful installation of the projector lift mechanism.
By diligently following the steps to mount the ceiling bracket for your projector lift installation, you establish a secure and stable base for the lift mechanism. This step ensures the safety, durability, and reliability of the projector lift setup, contributing to a professional and functional presentation environment.
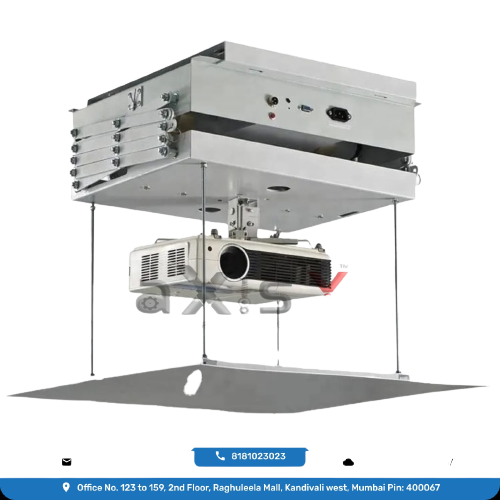
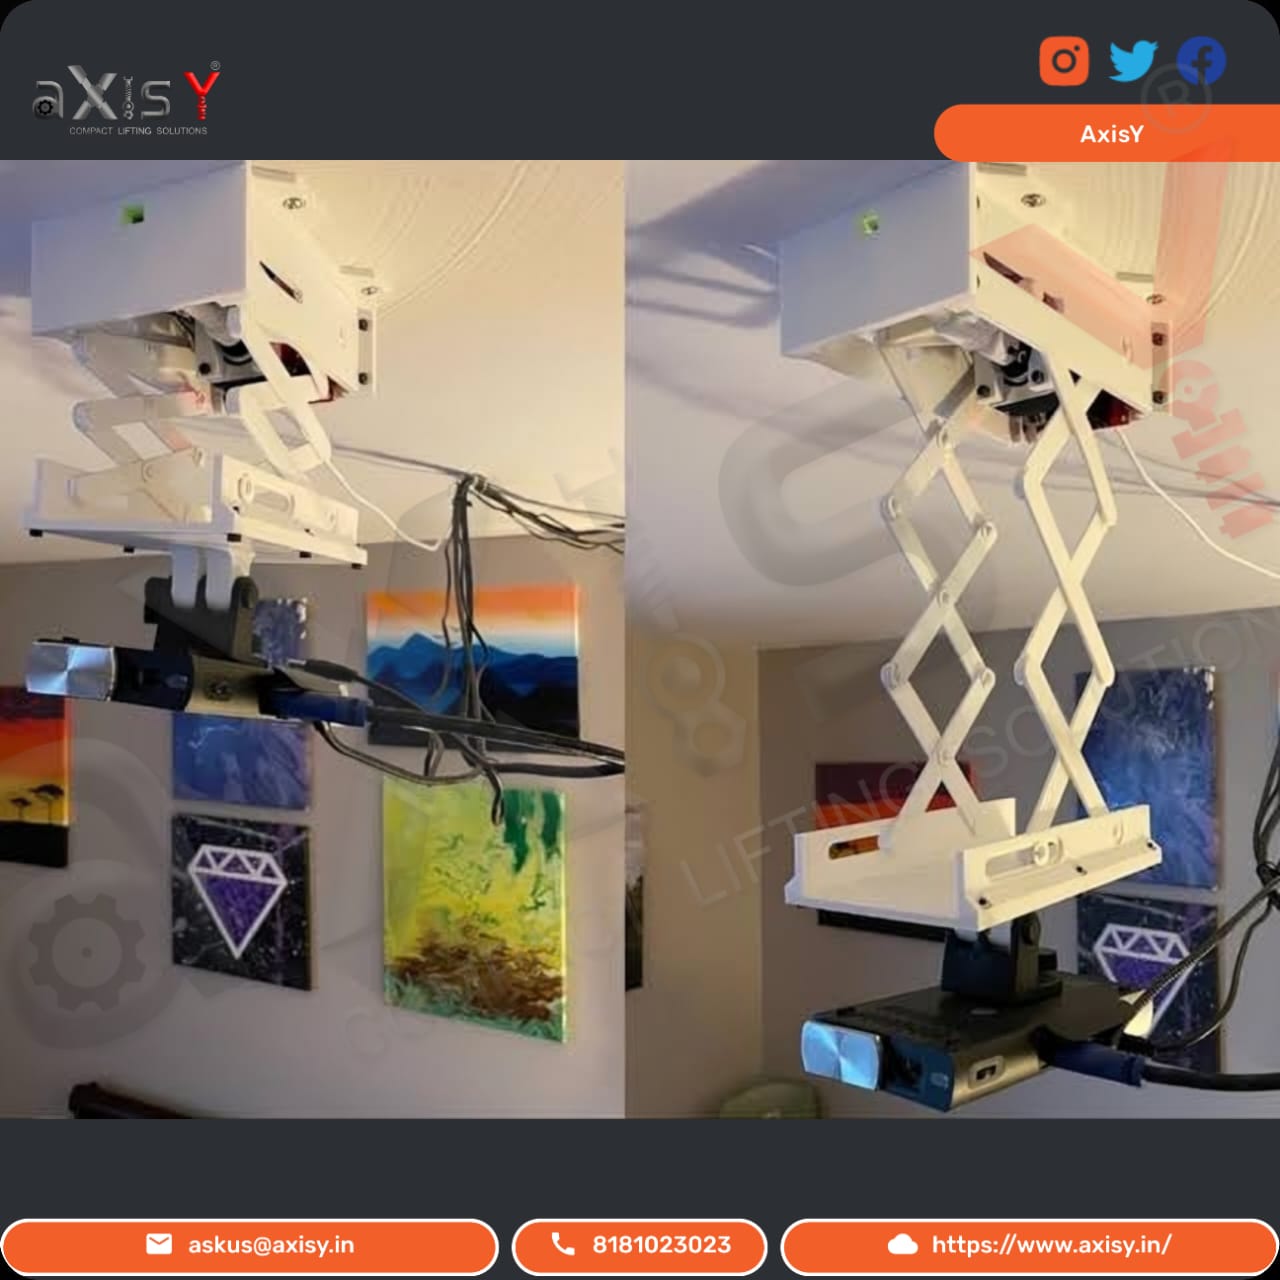
Step 5: Install the Lift Mechanism for Projector Lift Installation
Assemble the lift mechanism according to the manufacturer's instructions. This typically involves attaching the scissor arms or other lift components.
Installing the lift mechanism is a pivotal phase in the projector lift installation process. This step involves assembling and securely mounting the lift components, ensuring proper functionality and stability of the projector lift system.
Procedure for Installing the Lift Mechanism:
Assemble Lift Components: Refer to the manufacturer's instructions and carefully assemble the lift mechanism components according to the provided guidelines. This typically involves attaching the scissor arms or other lift components as specified.
Position the Lift Mechanism: Place the assembled lift mechanism in the designated installation area, ensuring alignment with the previously installed ceiling bracket. Position the mechanism accurately to prepare for secure attachment.
Securely Fasten Lift Components: Use the provided screws and bolts to securely fasten the lift mechanism to the ceiling bracket and structural elements. Follow the manufacturer's instructions for the recommended attachment points and fastening procedures.
Check Alignment and Stability: Verify that the lift mechanism is aligned correctly and securely attached to the ceiling bracket. Ensure that all components are properly connected and tightened to guarantee stability and functionality.
Perform Functional Test: After securing the lift mechanism, conduct a functional test to ensure smooth operation. Test the lift's movement to verify that it ascends and descends smoothly without any unusual noises or obstructions.
Importance of Installing the Lift Mechanism:
Functional Performance: Proper installation of the lift mechanism ensures its functional performance, allowing seamless vertical adjustment of the projector for optimal projection angles.
Stability and Reliability: Secure attachment of the lift components guarantees stability and reliability during operation, preventing any wobbling or instability that could affect the projector's positioning.
Preservation of Equipment: A well-installed lift mechanism helps safeguard the projector from potential damage or malfunctions, ensuring its longevity and operational efficiency.
Conclusion
Installing the lift mechanism is a critical phase in the projector lift installation process, ensuring the proper functioning and stability of the lift system. By carefully assembling and securely mounting the lift components, you establish a reliable and functional mechanism for adjusting the projector's position.
By meticulously following the steps to install the lift mechanism for your projector lift installation, you ensure a stable and functional lift system. This step guarantees the reliability, stability, and longevity of the projector lift, contributing to an efficient and professional presentation setup.
Step 6: Connect Power and Control Wires for Projector Lift Installation
Carefully connect the power and control wires according to the provided wiring diagram. Ensure the wires are routed safely and do not obstruct the lift's movement.
Connecting the power and control wires is a crucial phase in the projector lift installation process, enabling the lift mechanism to operate efficiently. This step involves carefully routing, connecting, and managing the wires according to the manufacturer's instructions for a functional and safe setup.
Procedure for Connecting Power and Control Wires:
Identify Power and Control Wires: Differentiate between the power and control wires provided with the projector lift kit. Usually, these wires are color-coded or labeled for easy identification.
Route the Wires Safely: Route the wires from the lift mechanism to the designated power source and control system according to the specified paths outlined in the manufacturer's instructions. Ensure the wires are safely tucked away to avoid interference with the lift's movement.
Connect Power Source: Connect the power wire to the designated power source, typically an electrical outlet or power supply unit. Ensure the connection is secure and follows safety protocols to prevent electrical hazards.
Connect Control System: Connect the control wire to the designated control system or control panel provided with the projector lift kit. Follow the manufacturer's instructions to ensure the proper connection for controlling the lift mechanism.
Secure and Organize Wires: Securely fasten and organize the connected wires using cable ties or cable management solutions. Proper organization prevents tangling, reduces the risk of damage, and maintains a neat and professional appearance.
Importance of Connecting Power and Control Wires:
Operational Functionality: Properly connected power and control wires facilitate the functionality of the lift mechanism, enabling smooth operation for adjusting the projector's position.
Safety Compliance: Correctly connecting the wires ensures compliance with safety standards and prevents potential electrical hazards associated with improper wiring or connections.
System Integration: Connecting the control wires to the designated control system enables seamless integration for controlling and managing the lift mechanism's movement.
Conclusion
Connecting the power and control wires is a crucial step in the projector lift installation process, enabling the operational functionality and control of the lift mechanism. By carefully routing and connecting the wires according to the manufacturer's instructions, you ensure a safe and efficient setup for adjusting the projector's position.
By meticulously following the steps to connect power and control wires for your projector lift installation, you establish a safe and operational lift system. This step guarantees the functionality, safety, and integration of the projector lift, contributing to an efficient and controlled presentation setup.
Step 7: Mount the Projector Platform for Projector Lift Installation
Securely attach the projector platform to the lift mechanism. Use appropriate screws and ensure the platform is level.
Mounting the projector platform is a crucial aspect of the installation process, as it provides the surface on which the projector will be securely placed and adjusted for optimal projection angles. This step involves securely attaching the projector platform to the lift mechanism, ensuring stability and proper alignment.
Procedure for Mounting the Projector Platform:
Prepare the Projector Platform: Ensure the projector platform is ready for installation. Check for any provided brackets, mounting plates, or fixtures required to attach the projector securely.
Align the Projector Platform: Position the projector platform on the lift mechanism, aligning it with the designated attachment points or fixtures. Confirm that the platform is centered and leveled for proper projector placement.
Securely Fasten the Platform: Use the appropriate screws, bolts, or mounting hardware provided in the projector lift kit to securely fasten the projector platform to the lift mechanism. Follow the manufacturer's guidelines for the recommended attachment method.
Double-Check Stability: Verify that the projector platform is securely fastened to the lift mechanism. Check for stability and ensure that the platform can support the weight of the projector without any wobbling or movement.
Perform Alignment Checks: Confirm that the projector platform is aligned properly for optimal projection angles. This alignment ensures that the projector will project onto the screen or display area accurately.
Importance of Mounting the Projector Platform:
Secure Projector Placement: Properly mounting the projector platform ensures a stable and secure surface for placing the projector, preventing any instability or movement during operation.
Optimal Projection Alignment: Aligning the projector platform allows for precise adjustment of the projector's position, enabling optimal projection angles and image quality onto the screen or display area.
Protection of Equipment: A securely mounted projector platform helps protect the projector from potential damage or misalignment, ensuring its safety and longevity.
Conclusion
Mounting the projector platform onto the lift mechanism is a critical step in the projector lift installation process, providing a stable and adjustable surface for positioning the projector. By securely attaching the platform and ensuring proper alignment, you establish a reliable setup for projecting high-quality visuals.
By meticulously following the steps to mount the projector platform for your projector lift installation, you establish a stable and adjustable surface for the projector. This step ensures the stability, alignment, and protection of the projector, contributing to an effective and professional presentation environment.
Step 8: Test the Functionality of the Projector Lift Installation
Before fully securing the projector lift, perform a test run to ensure smooth operation. Check for any obstructions or unusual noises during the lift's movement.
Testing the functionality of the installed projector lift is a crucial phase before finalizing the setup. This step involves performing a series of tests to ensure that the lift mechanism operates smoothly, the projector platform adjusts accurately, and the overall system functions as intended.
Procedure for Testing the Functionality:
Power On and Off Test: Start by powering on the lift mechanism and observing its movement. Ascertain that the lift smoothly elevates and descends without any jerks or unusual noises. Power off the mechanism and repeat the process to confirm consistent functionality.
Projector Platform Movement Test: Activate the lift mechanism to adjust the projector platform's position. Verify that the platform moves vertically as intended, providing the desired height adjustment for the projector.
Control System Test: Test the control system or control panel provided with the projector lift to ensure it effectively controls the lift mechanism's movement. Check that the control functions (up, down, stop) respond accurately.
Functional Integration Test: Integrate the projector with the lift system and test the complete setup. Verify that the projector mounts securely on the platform and that the lift mechanism adjusts its position smoothly based on control inputs.
Load Capacity Test (if applicable): If specified by the manufacturer, conduct a load capacity test to ensure that the lift mechanism can handle the weight of the projector without any issues or strain.
Importance of Testing Functionality:
Identifying Potential Issues: Testing the functionality helps identify any potential issues or malfunctions in the lift mechanism or control system before finalizing the installation.
Ensuring Smooth Operation: Conducting thorough tests ensures that the projector lift operates smoothly, facilitating seamless adjustments and reliable performance during presentations.
Safety Assurance: Functional testing ensures that the lift mechanism and control system operate safely, reducing the risk of accidents or equipment damage during use.
Conclusion
Testing the functionality of the projector lift installation is a critical step in ensuring its proper operation and reliability. By thoroughly testing the lift mechanism, control system, and overall functionality, you can address any potential issues and ensure a smooth and efficient setup for your presentations.
By meticulously conducting tests to ensure the functionality of your projector lift installation, you establish confidence in its performance and reliability. This step guarantees the smooth operation, safety, and effectiveness of the projector lift, contributing to a professional and seamless presentation environment.
Step 9: Secure All Connections and Components in the Projector Lift Installation
Once satisfied with the functionality, secure all connections, and tighten screws and bolts. Double-check the installation to ensure everything is properly aligned and fastened.
Securing all connections and components is a crucial phase in the finalization of the projector lift installation. This step involves ensuring that all wires, fastenings, and structural elements are securely tightened and aligned, providing stability, safety, and optimal functionality to the entire system.
Procedure for Securing Connections and Components:
Double-Check Wiring Connections: Verify that all power and control wires are securely connected and properly routed. Check for any loose connections and re-secure them to prevent electrical hazards or malfunctions.
Tighten Fasteners and Bolts: Inspect all screws, bolts, and fasteners used in the installation process. Ensure they are tightened to the manufacturer's recommended torque specifications to prevent any loosening during operation.
Alignment Verification: Check the alignment of the lift mechanism, projector platform, and other components. Ensure they are properly aligned and leveled to guarantee smooth movement and optimal projector positioning.
Stability Assessment: Assess the overall stability of the installed projector lift. Confirm that the lift mechanism is firmly anchored to the ceiling bracket and that all components are stable and free from excessive movement.
Safety Checks: Conduct safety checks to ensure there are no protruding wires, sharp edges, or potential hazards that could pose risks during operation. Address any safety concerns promptly.
Importance of Securing Connections and Components:
Prevention of Malfunctions: Properly securing connections and components minimizes the risk of malfunctions, ensuring the reliability and longevity of the projector lift system.
Enhanced Safety: Securely fastened components and aligned structures reduce the potential for accidents, ensuring a safe presentation environment for users and equipment.
Optimal Performance: Well-aligned and secured components contribute to the smooth operation and optimal functionality of the projector lift, providing consistent performance during presentations.
Conclusion
Securing all connections and components is a crucial final step in completing the projector lift installation process. By meticulously checking and tightening connections, fasteners, and alignments, you ensure the stability, safety, and optimal performance of the entire projector lift system.
By carefully securing all connections and components in your projector lift installation, you establish a safe, stable, and efficient system. This step ensures the reliability, safety, and functionality of the projector lift, creating an ideal environment for seamless and impactful presentations.
Step 10: Final Adjustments and Calibration for Projector Lift Installation
Make any necessary final adjustments to ensure the projector is positioned correctly. This may involve fine-tuning the lift's height or alignment for optimal projection onto the screen.
Conducting final adjustments and calibration marks the concluding phase of the projector lift installation process. This step involves fine-tuning the lift mechanism and projector platform to ensure precise positioning, alignment, and functionality for optimal projection during presentations.
Procedure for Final Adjustments and Calibration:
Height Adjustment Verification: Confirm that the lift mechanism provides the desired height adjustment range as required for optimal projector positioning. Adjust the lift accordingly if necessary.
Projection Angle Alignment: Fine-tune the projector platform to achieve the ideal projection angle onto the screen or display area. Ensure the projector's alignment and focus are optimized for clear and sharp visuals.
Control System Calibration: Calibrate the control system or control panel to ensure accurate and responsive control of the lift mechanism. Test all control functions (up, down, stop) to verify their effectiveness.
Check for Smooth Operation: Test the lift mechanism's movement and the projector platform adjustments to ensure they operate smoothly without any hesitations or irregularities.
Reconfirmation of Stability: Reconfirm the stability of the entire projector lift system. Ensure that all adjustments made do not compromise the stability or safety of the installation.
Importance of Final Adjustments and Calibration:
Optimal Projection Quality: Fine-tuning the projector lift ensures that the projector's position and alignment result in high-quality and properly projected visuals.
Enhanced User Experience: Calibration ensures smooth and responsive control of the lift mechanism, providing an enhanced user experience during presentations.
Long-Term Performance: Final adjustments and calibration contribute to the long-term performance and reliability of the projector lift installation, minimizing the need for frequent readjustments.
Conclusion
Performing final adjustments and calibration marks the completion of the projector lift installation process. By meticulously fine-tuning the lift mechanism, projector platform, and control system, you ensure precise positioning and alignment, resulting in optimal projection quality and user satisfaction.
By conducting meticulous final adjustments and calibration in your projector lift installation, you guarantee precise positioning, stability, and optimal projection quality. This step ensures the effectiveness, reliability, and user satisfaction with the projector lift, creating an ideal environment for impactful presentations.
Step 11: Conceal Wires and Finalize Projector Lift Installation
Neatly conceal wires using cable management solutions for a clean and professional appearance. Finish by cleaning the installation area and ensuring all tools and debris are removed.
Concealing wires and finalizing the installation marks the concluding phase of the projector lift setup. This step involves carefully managing and concealing the wires to ensure a neat and professional appearance while making the necessary final adjustments for a polished installation.
Procedure for Concealing Wires and Finalizing Installation:
Cable Management Solutions: Utilize cable management solutions such as cable trays, raceways, or clips to neatly organize and conceal the power and control wires. Ensure the wires are hidden from view and properly secured to prevent dangling or tangling.
Neat Routing of Wires: Route the wires along the ceiling or walls using designated paths or channels, ensuring a clean and unobtrusive installation. Concealment should be such that it does not hinder the lift mechanism's movement.
Secure Wiring Accessibility: Ensure that while concealing the wires, they remain accessible for future maintenance or adjustments. Concealment should not impede access to the wires if servicing is required.
Final Checks and Adjustments: Perform a final inspection of the entire installation, including wire concealment, lift mechanism, and projector platform. Make any necessary last-minute adjustments to guarantee a flawless finish.
Cleanup and Debris Removal: Clean the installation area, removing any debris, tools, or leftover materials. Ensure the workspace is tidy and free from any obstructions.
Importance of Wire Concealment and Finalization:
Aesthetics and Professionalism: Concealing wires contributes to a clean and professional appearance, enhancing the overall aesthetics of the presentation space.
Safety and Accessibility: Properly managing wires ensures safety by preventing tripping hazards and maintains accessibility for potential future maintenance or modifications.
Completion of Installation: Finalizing wire concealment signifies the completion of the projector lift installation, providing a polished and finished look to the setup.
Conclusion
Concealing wires and finalizing the installation is the concluding step in ensuring a neat and professional appearance for the projector lift setup. By managing wires effectively and making necessary final adjustments, you complete the installation with a clean and organized presentation space.
By meticulously concealing wires and finalizing your projector lift installation, you ensure a tidy, professional, and safe setup. This step signifies the completion of the installation process, presenting a polished environment for impactful presentations, ensuring user safety, and preserving the aesthetics of the space.
Conclusion
Projector lifts can be a great way to improve your home theater experience. They offer a number of benefits, including improved viewing experience, projector protection, added value to your home, and aesthetics. When choosing a projector lift, be sure to consider the type of projector you will be using, the height of your ceiling, the features you want, and your budget.